 Okay, I’m not suggesting that your barcodes are looking a little scraggly and in need of getting their chins cleaned up. Barcode shaving (also often referred to as pixel shaving) is a way of tweaking your barcodes to get the best, verified print quality.
In this article I want to dig a little into this process and how it relates to printing two-dimensional barcodes when using inkjet printers.
When producing 2D barcodes such as DataMatrix or QR code to GS1 standards, it is obviously important that the data is correct, the structure of the encoded data is correct and the quality of the printed code meets the quality standard.

Getting the data correct is really the job of the organization that’s printing the barcode, after all, it is their data.
The structure of a GS1 barcode is defined in the GS1 general specification. It’s relatively easy to check that the structure of the data is correct in some cases using a simple smartphone application – I’ve discussed this several times elsewhere.
In the GS1 system, quality for 2D barcodes, such as data matrix and QR codes, is defined in the ISO/IEC 15416 standard.
To verify the quality of a barcode against the standard, a number of measurements are taken using a calibrated verifier. All of these measurements each produce an individual grade which is then combined into one single overall score.
One of these parameters is called print growth. This measures the size of the elements in the barcode and ensures they haven’t crept above the size they should be.
With a 2D DataMatrix barcode, as an example, each of the little squares that makes up the symbol should be exactly the same size, both the dark and light squares.
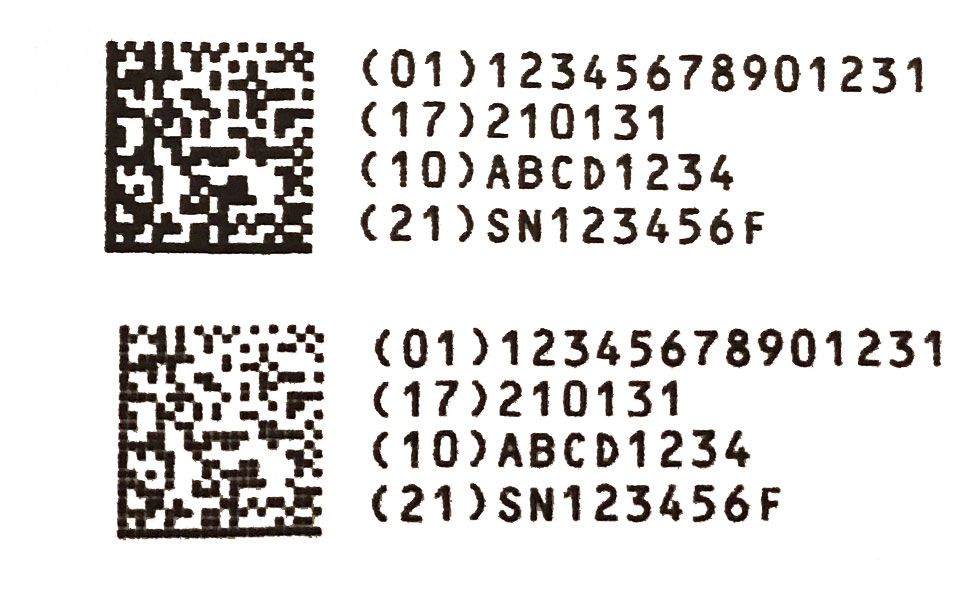
Look at these two examples:

One of them looks to be printed nice and darkly you – would think that it will be easy for a scanner to read and that its verification score will be good.
In the other example, the barcode looks somewhat lighter. Intuition tells us, that this one would be more difficult to read in the dark version and possibly would score less high in the verification
As it happens, both barcodes are easy to read with most barcode scanners – I can read them just fine with the Barcode Check app on my phone.
However, if you look more closely at the darker example, you’ll see that the darker squares are somewhat larger than the white ones – this is print growth.
What is Print Growth?
When printing with an inkjet printer, the image is produced of a number of very small individual drops of ink. The examples I’ve used were printed on our ClearMark Thermal Inkjet printer, set at 300 dots per inch in both the horizontal and vertical axis. Since the barcode is 0.5″ square, each size is 150 drops or pixels and the individual small squares that make up the barcode are 7 x 7 pixels.
As the drops of ink are sprayed onto the product, they dry quickly (assuming the ink is compatible with the substrate), but not instantly. There is often some time for the drops to spread a little before they set permanently, causing the elements on the image to be slightly larger than intended.
This is why when inspecting a DataMatrix or QR Code that has been printed using inkjet, the small squares that are printed are often too large as the ink spreads.
This is print growth – you can see in the darker example, that the black squares are infringing on the white ones – causing the white squares to be smaller, or even rectangular, rather than squares.
Print growth will downgrade the ISO score of your barcode – possibly to the extent that it fails verification.
So What’s The Solution?
In these situations, Barcode (or Pixel) Shaving is your friend.
With each of the small squares in my example barcode, our ID Technology and Code Tech TIJ printers (and our Greydon Genesis inkjet printers), allow pixels to be removed (shaved) from around each square. So I could make the elements of my barcode 6 x 6 pixels (instead of 7 x 7), but still centered in the same location. This allows the ink to spread a little in each barcode element, but still stay within its assigned overall area.
Using barcode shaving on our printers allows them to be fine-tuned to ensure the best verification scores for both DataMatrix and QR Codes. This is huge for customers who need to comply with GS1 standards, such as those in the medical of pharma industries.
Is it easy to set up?
Yes, this is easy to use on both our Code Tech and ClearMark printers.
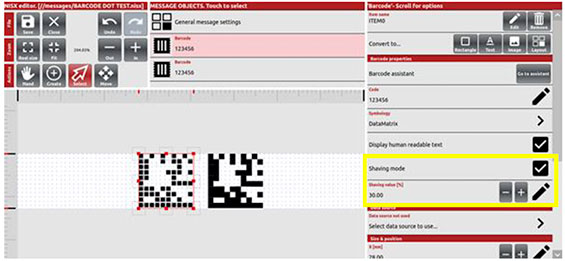
Here is the setting screen on ClearMark. You simply set the amount of shaving as a percentage. There is a little trial and error involved, but the setting is saved with the message to remember for next time.
So Shaving is Good?
Yes – this feature can be the difference between passing or failing barcode verification. It is often well worth the time to spend a few minutes fine-tuning your barcode settings, to avoid potential problems in the future.
Want to Learn More?
How can you start improving your own packaging coding in a variety of industries? Contact us today at 888-438-3242 Option#3. You can also email me at dholliday@idtechnology.com We’ll get you in touch with one of our local experts right away.


 Labeling & Coding News is the online industry insider from ID Technology, EPI , Panther, Greydon, and Code Tech Labeling & Coding product brands of ProMach.